Now that the tires are on there she is starting to look like a REAL Jeep. They are so far out of balance that we are having to order some beads to throw in there to balance them up. Was … Continue reading
Featured Photo
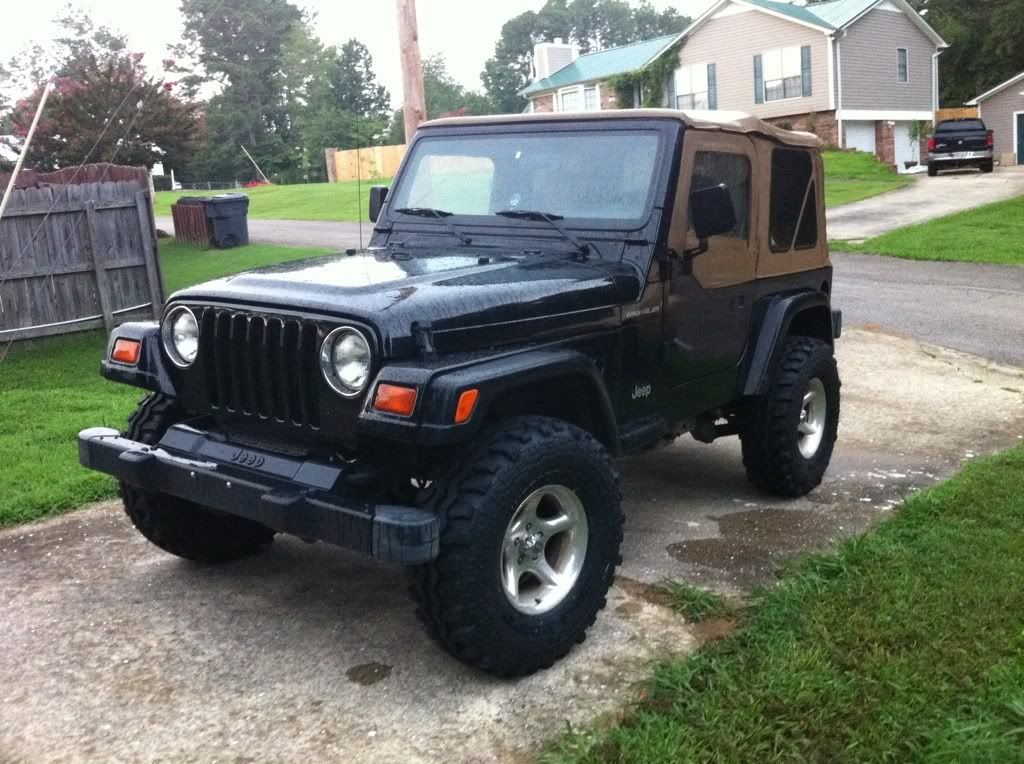
She ain't Stock No More

Now that the tires are on there she is starting to look like a REAL Jeep. They are so far out of balance that we are having to order some beads to throw in there to balance them up. Was … Continue reading
So now I know why Off Road Connection charges so much to put on a body lift. Got to Joe Bob’s at 10:45 this morning and at 4:00 Joe had to stop what he was doing to help me get at least enough of it done to be able to get back home before the wife had to leave and just come back later and finish. It probably wouldn’t have been nearly as difficult had Performance Accessories actually put instructions for a Jeep Wrangler in the kit instead of a Toyota 4runner. But the way it was, Joe was telling me what I needed to do from memory while fixing an air conditioner on a 10 year old conversion van and I was learning as I went as well. And I am fairly sure it had been a while since he had put a body lift on a TJ. LOL
I can honestly say I had no idea that there were 2 body mounts hidden on a cross member on top of the axle that could only be seen and gotten to after removing the rear wheels. The only reason I found that was by using google. Add to that the fact that the kit didnt come with anything to correct the steering shaft problem. Joe ended up using a spacer to move the shaft anchor up until we can figure out what else to do. Plus there were a SHIT ton of parts left over… actually the more I think of it, maybe the wrangler label on the outside of the box was wrong and the 4runner instructions inside the box were the right ones for the kit afterall.
Regardless, my baby is sitting 3 inches taller right now and the rest will just have to get figured out later. I had meant to take lots of pictures to include in this post, but until around 1:00 I was working outside the garage in 110 degree heat with the heat index, and as soon as I got it moved into the garage it came a torrential downpour until moments before I finished and left. So unfortunately there are no pics as of yet but I will add a couple of the finished product so far tomorrow. It’s too dark to take any that will show anything at this point.
Before you start jacking up the body, there are a few things you need to do. A few of which I did not know about until after I started.
Once all that is done, get under the Jeep and look all the way down both frame rails on each side and in the front and back to make sure there is nothing else connected to both the body and frame. Also look around where your transmission and transfer case is and make sure there is enough slack in those wires for the body to go up 3 inches. Your rear brakes shouldn’t be an issue since they are attached to the frame and not the body. In the front, however, the lines coming out of the master cylinder will be moving up with the body while they are still anchored to the frame. You shouldnt need to remove these, but while you are jacking up the body on that side, you should keep an eye on these and possibly have to help them bend the right way to keep pressure off your master cylinder. There is plenty of line there for this, it is just bent back and forth a few times which makes extending the lines unnecessary.
Jack her up on both sides, put some jack stands under the body on each side for safety, and throw your 3″ pucks in between the body bushings and the body itself. On each of the body mounts, there will be a bottom bushing that came off when you removed the bolts. You are going to reuse these, so slide your washers on the bolts and then put these back on the new bolts the same way they came off the old bolts. There are 2 different size bolts that come with your kit, the smaller bolts will go in the rear mounts, the mounts on the cross member above the rear axle, and the front mount under the grill. You will also notice the bottom bushings on these mounts are different than the others as well, so don’t get those mixed up. The larger bolts are used on the 3 mounts on each side under the doors.
This part is easier if you have someone to help you so you dont have to get up and down over and over working the jack, which I didn’t so by the time I was done, my legs were tired as Hell. Guide your bolts up through the mounts, through the bushings and pucks, and start them into the mount holes in the body but don’t tighten them. Once you get all of them except for the front one done, let your body down. You will need to make sure your body didnt shift to the left or right during the install, which mine did about a half inch. Use some sort of straight edge (I used a long pry bar) and hold it against the side of the font bumper on one side and see where it comes to on the front of the fender. Then go to the other side and compare. If it needs to go one way or another you will need to shift the body over appropriately. I just pushed like Hell a few times on it in the front, middle, and back and after a few tries I was back center. Now you can put the front puck in. You might have to use the jack again close to the front to get it in, but I didnt. The other pucks were holding it up enough that it just slid right in.
Now that you’re centered, tighten all the body mount bolts up. If you are lowering your radiator, there will be brackets included in your kit for that as well as a fuel filler hose extender and extenders for other hoses on the fuel tank. Your kit SHOULD also include a bracket of some sort to bolt your steering shaft anchor point back down, even though mine was obviously left out. We didn’t get to any of the fuel tank hoses so my filler nozzle is down just inside the body where the fuel filler thingy (technical term) that we removed earlier was. I will take care of this in the next couple days but it isn’t hurting anything besides its looks to be like this temporarily.
There is a gear shifter extender included if you have a manual transmission, as well as a bracket for the transfer case linkage. We didn’t get to these either but will in the next few days. For the gear shifter, you will remove it from the top of the transmission through the hole in the floor, cut it in half, and weld the extender in the middle. Some people opt to just heat up the shifter with a torch and bend it to allow it to not hit the back of the shifter console when in 2nd and 4th gear (and 6th if you have a 6 speed), but I want to extend mine up because it’s just more comfortable to have the shifter at the stock location inside the cab. The transfer case shifter bracket just goes in the linkage to bring the geometry back to where it was before the lift, other wise you can have trouble getting it to go in 4wheel low if you are in a bind.
After all was said and done, the Jeep is sitting 3″ higher, and my ass is sagging 3″ lower. I won’t lie. Fat guys just don’t take the heat as well as some others. Turns out the only thing I did all day that didn’t require me to go back and redo was deciding this morning before I left home to take a dry shirt to put on once I was done. You have NO idea how much better I felt just after putting that baby on. And the shower I took once I got home was even better.
I will take a few pics tomorrow morning of what it looks like currently. Then it’s time to throw the meat to her. Once the tires are on I will take a few more pics and then post them all that evening. Hopefully I will be able to get all the other stuff finished up this weekend so I can go back to driving her next week and maybe get a trail ride in soon. =D
Posted in Modifications or fixes
So obviously, I have to have some direction I want to go in with this project, otherwise I will be just aimlessly throwing modifications at this thing with no real goal in sight. Which probably isn’t the best way to go about this. I have to find a happy medium between trail rig and street Jeep. Enough lift to fill my offroad needs without it becoming too gaudy or top heavy to drive regularly. To start off, getting enough lift to fit 33″ tires will be sufficient, but by no means do I want to stop there. I eventually want to fit 35’s. For this to be possible, a few things will have to happen.
These are all things that I will be addressing down the road. For now, as I said earlier, I want to get this thing fitting 33’s so we can have some fun in the meantime while we slowly but surely upgrade our TJ piece by piece until she is ready for some big meat… Wow that sounded dirty. 😀
A 3″ body lift will be enough to get the 33’s under there, but I like to have a little space between my Jeep and its tires. For this, I am going with a cheap, temporary workaround and get some 2″ coil spring spacers.
 The body lift is basically a bunch of blocks, that go between the frame and the body mounts to lift the body up, while keeping the stock suspension in place. This allows fitment of larger tires while keeping the comfortable, stock ride quality.
 The coil spring spacers are what amount to hockey pucks with holes in the middle that go on top of the coil springs, giving the same lift effect of larger springs, but like the body lift, keeping the stock ride quality.
These 2 together will net me a total of 5″ of total lift without losing any comfort on the road. Later down the road, we will be doing away with the spacers and installing a long arm full suspension kit which, on top of our 3″ body lift, will get us clearance for our 35’s and also add a great deal of axle articulation.
 I have already purchased the body and spacer lifts, as well as a set of front sway bar quick disconnects and plan on installing a them all in the next week or so. Late model Jeeps have whats called a sway bar that helps keep the Jeep standing straight up and down in sharp curves instead of leaning way over to the side which can result in rolling over at high speeds. This is GREAT on the pavement as it allows you to drive your Jeep at normal speeds without having to worry about ending up upside-down in a ditch. On the trail, however, it prevents axle articulation. Being able to quickly and easily disconnect and reconnect the sway bar will allow me to have the best of both worlds, which is exactly what we are going after with this project.
Now that we have all that we need to get our 33’s under there, there is one more thing we need… the actual tires themselves. For this I went with Super Swamper TSL Radials 33×12.50×15’s. The TSL’s have the aggressive mud lugs we want in the woods, and being a radial means that they will last a bit longer on the pavement. They came in Thursday and I gotta tell you, they look mean. (I forgot to take pics of the tires but I will have pics of them once they are on the Jeep.)
Other upgrades on the menu are a new front bumper with a winch plate to mount us a nice Ramsey 9000 winch that I got for free a few years back that needs the solenoids replaced, some lockers to get us more traction in the woods, and some lights so that we can see better on the trail for when the sun goes down. I will get more into these as we go along, as well as the other upgrades to be done later once we start working towards 35’s.
Posted in Modifications or fixes
Tagged 33, 35, lift, modification, plan, tires, upgrade, Wrangler
She ain't Stock No More
